Patterns
Saturday, 18 December 2010

We had heavy snow overnight and so I woke to a white world this morning...

Offspring disappeared almost instantly, like tins of chocolate biscuits do if you leave them un guarded on the kitchen table...

A tree was snaffled from the woods yesterday and decorated this morning (by pj clad littlest) with years of collected shiny treasure...

But did I have bunting for over the kitchen sink??
No, I did not!!!

I chose 4 bright Christmassey colours of cotton DK and made some crochet triangles. Heres how...
Row 1 - Make a slip knot to start... chain 3 then work one treble into that first slip stitch. You have 2 trebles.
Row 2 - chain 3 then make 1 treble into the first of these chains to increase, work 2 trebles into the next treble top. You have 4 trebles.
Row 3 - As before increase at each end and work 2 trebles in the centre. You have 6 trebles.
Continue increasing an extra stitch at the end of each row for another 4 rows. Cast off and sew in your ends.
Make as many as you want / need...

Find a contrast colour for the bunting cord and make it like this...
Make a slip stitch to start, then chain 25. Take your first triangle and work double crochet all the way along the top edge. When you get to the end work approx 15 chains to form the spacing cord between the triangles... repeat until you have used all of the triangles, then work another 25 chains for the other end. Cast off and neaten.

Balance precariously on a very wobbly chair and hang your new bunting over the kitchen sink using the last 3 remaining drawing pins on the planet...
Wash ALL of the days accumalated dishes and intermittantly gaze upwards at your new bunting, smiling broadly... washing up will never be the same again...
Ren x
Wednesday, 28 July 2010

A How To project for your hooky pleasure from me to you! Its quick, its light, its pretty, its adaptable, it could be a bag, a cushion, a scarf, a blanket...
Ingredients:
5.5mm crochet hook
Aran weight wool blend yarn in 3 colours as follows, 200 gms of colour A, 200 gms of colour B, and 300gms of colour C. You can in fact make this with any weight wool but make sure you change your hook size to suit!
Stolen time... take your blanket bag with you WHEREVER you go...
 Method:
First of all using colour A chain 22 (not too tightly remember).
1st row - Insert hook in the third chain from the hook and work trebles (for British crocheters or double crochet for Americans...) all along the foundation chain. You should have 20 treble stitches there all lined up nice and neat.
2nd row - chain 3 to count as the first treble, then work 1 treble into next stitch, this is the eyelet row, basically it consists of 2 trebles, *chain 1, miss a stitch, then 1 treble into each of next 2 trebles* and repeat from* to* across the row. See picture below to illustrate the eyelet row.

3rd row - working 3 chains to count as first treble repeat the last eyelet row.
4th row - 3 chains to count as first treble, then work trebles into every stitch including the eyelet spaces across the whole row. Have a count, you should still have 20 stitches!!!
Repeat rows 2 to 4 untill 10 rows have been worked.
NOTE on the last stitch - before you take those last 2 strands off of your hook you need to join in the last colour for a tidy beginning on the next square! Simply let go of colour A, pick up colour B leaving a long tail for darning in and use it to complete the stitch. You now have B ready on your hook to make the next square.
Continue like this making the squares and alternating colours as you wish until the strip is as long as you want it to be. I worked 8 squares as I want my finished blanket to be 8 x 8 squares in size. This is approx 130 cms with the border.
Starting the next strip and joining as you go...

Obviously it goes without saying that WE all hate sewing in ends... we'll have none of that here! The only ends to sew in are the start and the finish of the square. Heres how...
To start the next strip, simply change colour as above and instead of working the next square, work 22 chains to form the foundation for the next strip. You then work back up the strip that you just made!
Below is another image showing the joining method at the end of a row.

When you have the last incompleted stitch on your hook with 2 strands showing (prior to wrapping and pulling through) push your hook through the top of the adjacent row of trebles of the first strip.

Just like this! Pick up your working yarn and pull it through to complete the stitch. There is your first join!!

To start the next row (this is the eyelet row by the way), work 2 chains.

Then push your hook into stitch opposite, its there at the very tip of my finger in the picture.

Pick up the working yarn and pull it through.

Now turn your work so that the other side is facing you.

Working into the top of the next stitch pattern across the row.
Turn, and repeat, changing colour when necessary until you have completed the second strip.

Isnt that nice and tidy!
NOTE - finding the top of the second to last stitch as you are working the join up through the strip can be difficult. The pictures below show in detail where to put your hook! If you find it a fidget, then simply work both of these last two stitches into that last coloured space below! It still looks good and is quicker!

2 stitches left to work before the join and Im wondering where do I insert the hook? The stitch is very slightly twisted so the usual easy to spot V is pointing towards the back of the work. Push the hook in as shown.

There we go, the stitch is being worked.
To work the last stitch (the joining stitch) insert the hook into that space inbetween the last 2 trebles of the row underneath. Work as described earlier.
Working the LOVE in!

You can use your hook to embroider the LOVE on the blanket. I have worked mine into the 4 corner squares.

Leaving a tail end and holding the working yarn under your work, insert your hook and pull through to the top.

Keeping things nice and loose, push your hook in again and pick up the yarn from underneath, pulling it through that loop on your hook.

Work along the surface, literally drawing your letter shape with the hook and yarn.

Easy peasy!

The back of the work is nice and tidy too.

I worked a heart in place of the O... because its for my tiny tiddlywink.
My blanket still isnt completed because Im working on 20,000 projects at once... but its not far off completion. I shall work a border with yarn C (hence the extra ball) of half trebles, then a tiny bobble edge to finish.
Then I will start another one because its just been too easy for words! I hope to have a new delivery of Aran 50% wool blend yarns arriving next week. The colours are truly lovely and I feel I may have to steal some shop stock for the next woolly adventure...
This pattern has been drafted for personal use only please.
REN CUMING 2010
Wednesday, 26 May 2010


Brown Sparrow Cardigan by REN CUMING
This pattern is sized to fit a Medium.
Loose on a UK 10/12, Fitted on a UK 14 and snug on a UK 16.
Ingredients:
DK yarn – I used a pure wool yarn as it’s a good long term economical choice!
1 x 50gm ball of your contrast colour (referred to as B).
**If you want to knit both fronts or both sleeves at the same time on one pair of needles you will need 2 balls of the contrast colour!
8 x 50gm balls of the main colour (referred to as A).
I pair of 3.25 and 4mm needles.
Any type of yarn as long as you can achieve the following tension.
17 stitches and 25 rows, over a 10 cm x 10 cm sample knitted in stocking stitch.
Method:
Back.
Using contrast yarn B and 3.25mm needles cast on 81 sts.
Change to yarn A and work in K1, P1 rib for 6 rows.
Increase 1 stitch at each end of next row. (Increase in this manner on every following 6th row until you have 97 sts.) Continue in rib for another 3 rows ending with RS facing you.
Switch to 4mm needles and using stocking stitch, work 2 rows.
Change to yarn B (do not break yarn A, simply strand loosely at the side) and work 2 rows of St st, ending with RS facing, break yarn B leaving a tail for sewing in later.
Change to yarn A and using stocking stitch work 4 rows.
Strand yarn not in use behind the other stitches, never going more than 3 stitches without carrying it.
Simple fairisle cross pattern (worked over 3 rows):
Row 1 - Using (yarn A knit 4 sts, using yarn B knit 1 st) repeat to end.
Row 2 – Working in purl, work the centre 3 stitches of the cross, placing the centre stitch over the last rows coloured stitch.
Row 3 – Work as for row 1, forming the top of the cross with a single coloured stitch as before.
Work 4 rows in yarn A alone.
Work 2 rows in contrast yarn B.
Working in main colour only continue in stocking stitch increasing as already set until work measures 27cms from cast on edge.
Shape armholes thus…
Cast off 4 stitches at beginning of the next 2 rows.
Decrease 1 stitch each end of next 7 rows.
Decrease 1 stitch each end of following 5 alternate rows.
Continue with remaining 65 stitches until armhole measures 20cms from beginning of armhole shaping
Shape shoulders…
Cast off 6 stitches at beginning of next 2 rows.
Cast off 6 sts, knit 10 then turn, working on these stitches only. Cast off 4 sts knit to end. Cast off remaining 6 sts.
Rejoining the yarn, cast off centre 21sts, knit to end. Work this side to match other, reversing the shaping directions.
Left front.
Using contrast yarn B and 3.25mm needles cast on 40 stitches.
Change to yarn A work K1, P1 rib as for back, again increasing as before on every 6th row at the outer seam edge only until you have 48 sts.
As set by the back, work the colour band on each front, placing the first cross carefully to match on each side.
Continue until work matches back to underarm shaping.
Shape armhole…
At seam edge, cast off 4 sts.
Work I row.
Cast off 1 stitch at seam edge on next 7 rows.
Start shaping neckline…
At neck edge cast off 6 sts, knit to end, (but continue shaping armhole by decreasing 1 st at seam edge on following 5 alternate rows). Decrease 1 st at front edge on next 5 rows, and then on every following alternate row till just 18sts remain.
Continue without further shaping until front matches the back to shoulder shaping.
Shape front shoulder…
Cast off 6sts at seam edge on next row and following alternate row. Work one row. Cast off remaining 6 sts.
Right front.
Work as for left front, reversing all shaping.
Some people work both fronts on the same needles at the same time to make sure they match… it’s a good idea, but you will need an extra ball of the contrast colour to do this!
Sleeves (make two, again you can make both at once on the same needle).
Using contrast yarn B and 3.25 needles cast on 43 sts.
Change to yarn A and work 1 x 1 rib for 8 rows increasing 1 st at each end of last row. (Continue increasing thus on every following 6th row until 67sts).
Change to 4 mm needles and work 2 rows of stocking stitch.
Change to contrast yarn and work 2 rows… this sets the colour band as used on the back and fronts. Once you have completed the color band continue working in stocking stitch with the main colour until your sleeve is the desired length. Approx 40cms.
Shape underarm…
Cast off 4 sts at beginning of next 2 rows.
Decrease 1 st at each end of next 7 rows, and again on following 5 alternate rows. Work 4 rows decreasing at each end of this 4th row, work another 4 rows, again decreasing at each end of the 4th row.
Decrease 1 st each end of next 5 rows.
Cast off 3 sts at beginning of next 4 rows.
Cast off remaining 9 sts.
Block all pieces as necessary ready for assembly.
Buttonband.
Using main yarn A and 3.25mm needles, cast on 5 stitches.
Work in K1,P1 rib working your first buttonhole approx 2cms from beginning, make the front band long enough when slightly stretched to fit right front from hem edge to beginning of neck shaping.
Work another band, omitting the buttonholes for left front.
Stitch these bands neatly in place.
Neckband.
With main colour A and a pair of long 3.25mm needles, and right side of work facing you, carefully pick up and knit stitches evenly around neckline. You will feel what is the right amount so have faith in yourself! Just make sure that each front neck has the same number of stitches.
Work in K1,P1 rib for 6 rows.
Cast off neatly in rib.
Sew in your ends, match up the buttons to buttonholes and sew on carefully.
Design notes: This cardigan can be varied so much it’s a dream. Change the colourband to have a different pattern. Leave the colourwork out altogether. Crochet embellishments for the neckline. Add small knitted patch pockets… Its endless!
NOTE: I would love to see your finished project made using this pattern. Please tag completed projects online as #fairysteps or #fairystepsknits
Fancy a pretty little flower border... Mary, Mary, quite contrary, how does your garden grow?

Heres a quick close up to give you an idea of how I worked one.

This pattern has been drafted for personal use only please!
Copyright FAIRYSTEPS 2010
Friday, 7 May 2010

Everyone loved this hexagon pattern that I invented so much, and lots of people on and off the internet have asked for a pattern so I decided that I must sort it out. So here we go a very, very long detailed tutorial showing every step including how to join them up without sewing and a few tips on the way too!
Its quite a plain hexagon which is just what I wanted. It simulates the traditional Grandmothers Flower Garden patchwork design.
Directions:
I used a 4.5mm hook
For a lap and leg size blanket like this one I made here you will need 7 flower blocks.
50 gms of DK yarn should complete each flower block, so buy 7 pretty colours.
50 gms of yellow for the flower centres. I worked out that I used approx 7 yards of DK wool for each hexagon.
Buy at least 250 gms for the borders, bearing in mind that you may need more (choose a nuetral shade for the pathways. If this is a project that will be made over a length of time using project leftovers then an easily found pathway colour may be best, like black, white, ecru or grey).
Written using British crochet terms.

As always we start with a slip knot, then work 4 chains.

Slip stitch into the first chain to join.

Holding the tail and the main yarn chain 3 (this does make it a wee bit bulky, but it makes it worth while to eliminate sewing in this end, you can just snip it off).

Chain another 2 with just the main yarn (5 chains in total), then work 1 treble into the centre loop.

Chain 2.

Work another treble into the centre loop, and continue working 2 chain spaces and 1 treble into that centre hole untill you have 5 'holes'.

Work 2 chains ready to join the circle.

Push the hook into the 3rd chain and work a slip stitch by simply picking up the yarn and drawing it through the work and the loop on your hook.

There... this round is complete, time to work the next round.

We have to get the yarn in the right position first (patterns never explain this...). Put your hook through the next adjacent hole and pick up the yarn, pull it through the hole and the chain on the hook (slip stitch).

Then work 3 chains (to count as first treble). See how that slip stitch moved us into the edge of the space? Rather nifty.. I invented that!

Work another treble and then 2 chains (the chains become the corners of our hexagon).

Work another 2 trebles into the same space. This corner is now complete.

Work 2 trebles, 2 chains, 2 trebles into every remaining space.

Nearly all done...

A neat slip stitch joins the ring and completes the round.

Remember we did that nifty slip stitch trick before to get the yarn into the correct working position... time to do it again! Push into the top of the next available treble and draw the yarn through the work and the stitch on your hook too.

There, all done, nice and neat.

Now work 3 chains to form the first treble of the third and final round.

As before we are working 2 trebles, 2 chains, 2 trebles into every corner space.

Work 1 treble into the top of the next available treble (its number 2 on the row below).

Then work 1 chain.

Missing one treble top, work 1 treble into the next treble top (thats number 2 treble from the bottom row).

You will then be ready to work the next corner (2 trebles, 2 chains, 2 trebles).

Continue working the corners as set and 1 treble, 1 chain, 1 treble into the middle of the rows all the way around.

Work one chain to finish and then join the round with a slip stitch, as before, to finish. Cut a nice long tail of yarn for finishing off. You will get really quick at these! About 5 minutes to make each...
And now for how to join them up as you go, saving that tedious sewing up bit at the end which we all loath!

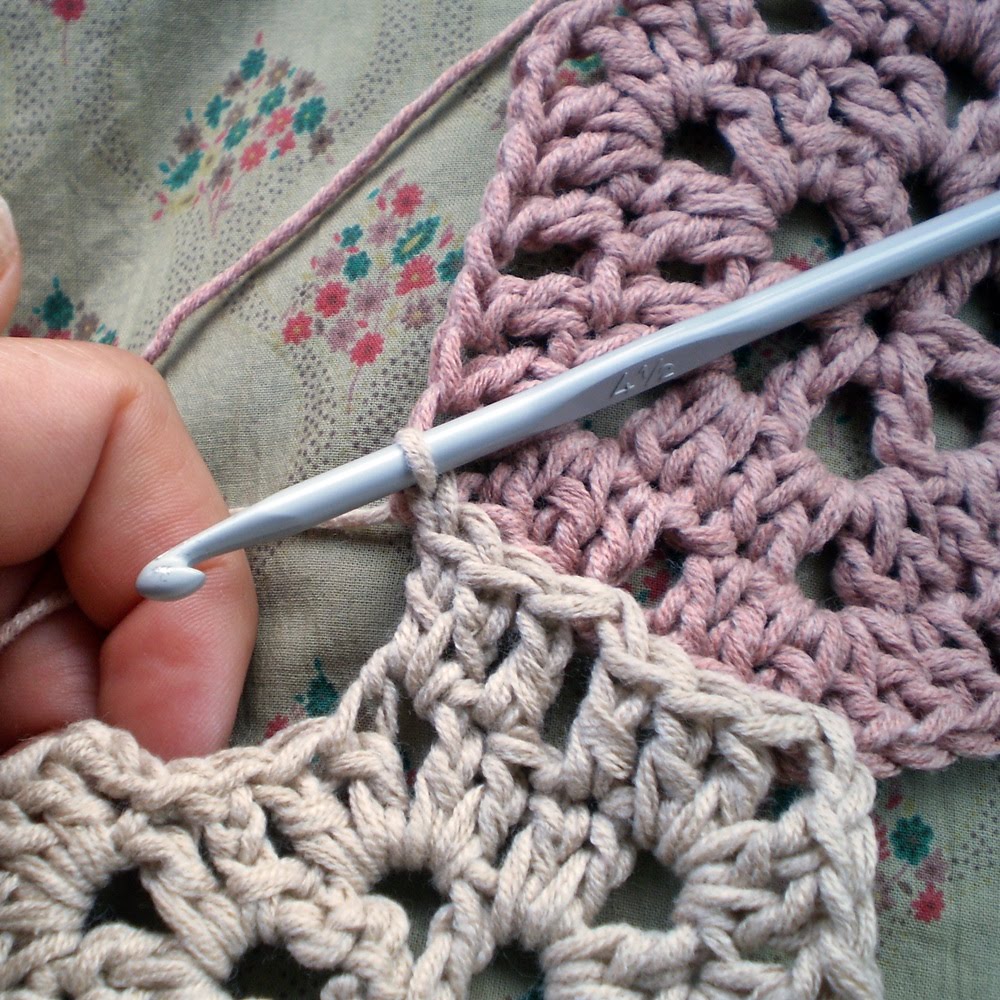
This really depends on how many sides are being joined at once. If you are working into a corner there may be 3 sides being joined. Its perfectly do-able and these pictures will show you how. I have one side to join here so Ive worked all the way around my third round and left one complete side unworked and ready to join. Ive worked just 1 of the corner chains.

Push your hook through the other hexagons corner space and pick up the yarn.

Draw it back through the space and the stitch on your hook (thats the second chain of the corner groups effectively worked BUT through the other hexagon too!).

This is what it looks like.

You can now carry on with the 2 trebles into the corner space.

As before wotk the first of those centre trebles.

And work the chain through the next space on the other hexagon as we did on the corner, catching it in place.

Carry on working the next of the middle trebles.

Then work 2 trebles into the corner space.

And once again work that (first this time) chain through the corresponding corner space, as shown.
Nice and neat.

Then chain 1 and complete the corner.

And around you go to complete the hexagon your are working on. All joined up, nice and neatly and not a sewing needle in sight!

The back is equally as tidy!
Well... there we go then! This took about 4 hours to do so I hope very much that Ive done it right and that it proves helpful to someone!!!
If you use these instructions for your own project I would be very glad of a link back to the blog. Maybe post a picture on Ravelry??
This tutorial has been drafted for personal use only please.
Copyright REN CUMING 2010
Subscribe to:
Posts (Atom)
Social Media
Search